

How To: Style a HTML file upload control using CSS and JavaScript

If you’ve ever tried, you’ll know that styling an html file upload control is like flogging a dead horse.
Due to the security issues of enabling any user to upload files directly to a server, html file upload controls have evolved to be pretty robust. You cannot write the value attribute of them with JS; you can imagine what a malicious script could do with that! You cannot change the button text which is defined and locked down by the browser.
Because of the efforts of browsers to minimize the attack surface, most of the CSS properties we usually use to style form controls don’t have any effect. This leads us, inevitably, to hybrid frontend workarounds if we want to manipulate the way these controls look on our page.
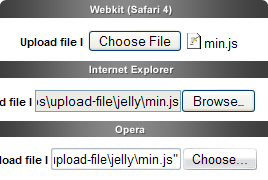
As you can see from this image, there is a fair amount of variation in the way browsers deal with the file upload control. Webkit differs the most by not showing the path to the file name you select, and since we can only reliably read the the actual file name with JS, we’ll follow this pattern (I think the Webkit approach is the most elegant anyway).
The spec
What we’re aiming for is a nice fat button where we can have full control over the button style and text. We want a solution that will behave nicely and consistently in all the browsers, and be versatile enough to cope with modifications and variations.
The demo
Check out the working demo here.
The details
The html markup is pretty simple, we just want to create a button-like unit which can be placed anywhere in a form:
<div class="file-upload-btn">
	<label for="file-upload-1">Upload file</label>
	<input id="file-upload-1" type="file" name="uploaded" />
</div>
The main trick is in the CSS. What we’ve done is place the upload field in an element with display set to inline-block and overflow set to hidden. We position the label over the field to create the button text. By making the upload field font-size very large we essentially create a large hit area that will give us the basic button functionality.
To customise the appearance, first we set the upload field opacity to 0 (a different property is needed for Internet Explorer as you can see in the source). Now we can add background images and border effects to create the look and feel. View the commented CSS for the full treatment.
Using JS we have lazy-loaded the CSS file. One advantage of this is that we maintain a clean separation between our general site CSS and the UI element specific CSS; just tagging chunks of CSS onto a main file for every UI widget is an approach that will not scale for websites that have a growing number of JS dependant widgets. Another advantage is that the styles will only be applied if JS is available, so we can have graceful degredation with minimal effort.
I should note that the Jelly Javascript library is being used for this demo. However, you should be able to port the code to a library of your choice if you know your JS and chosen library well.
To create the uploaded file label, we bind a handler to the file upload onchange event which dynamically inserts (or removes) an element after the file upload element. Some other display issues are also addressed; view the commented JS for the full details.
Tagged with: